Remove System Progressive Protection (TUTORIAL) <!--more-->
System Progressive Protection is a computer virus,which will report that malware was detected on your machine however if you try to remove this infections, it will state that you need to buy this product before being able to do so.Here are some of the bogus alerts that you may encounter:
Spyware.IEMonster activity detected. This is spyware that attempts to steal passwords from Internet Explorer, Mozilla Firefox, Outlook and other programs.
Click here to remove it immediately with System Progressive Protection.System Progressive Protection Warning
Your PC is still infected with dangerous viruses. Activate antivirus protection to prevent data loss and avoid the theft of your credit card details.Warning: Your computer is infected
Detected spyware infection!
Click this message to install the last update of security software.
System Progressive Protection is a scam,and all its alerts and warnings are just an attempt to scare into buying this product and stealing your credit card details.
When System Progressive Protection is first installed, it will make changes to Windows so that when you launch an executable, this rogue antivirus will be started instead and a pop-up message saying that the .exe file is infected and cannot execute will be displayed.
When System Progressive Protection is first installed, it will make changes to Windows so that when you launch an executable, this rogue antivirus will be started instead and a pop-up message saying that the .exe file is infected and cannot execute will be displayed.
Warning!
Application cannot be executed. The file notepad.exe infected.
Please activate your antivirus software.
System Progressive Protection will also hijack your web browser so that it display a security warning whenever you attempt to visit a website. The text of this warning is:
Warning! The site you are trying visit may harm your computer!
Your security setting level puts your computer at risk!
Activate System Progressive Protection, and enable safe web surfing (recommended).
Ignore warnings and visit that site in the current stat (not recommended).
If this happens,you can safely click on Ignore warnings and visit that site in the current stat (not recommended),so that you’ll be able to visit the desired site.
If your computer is infected with System Progressive Protection,then you are seeing this screens:
If your computer is infected with System Progressive Protection,then you are seeing this screens:
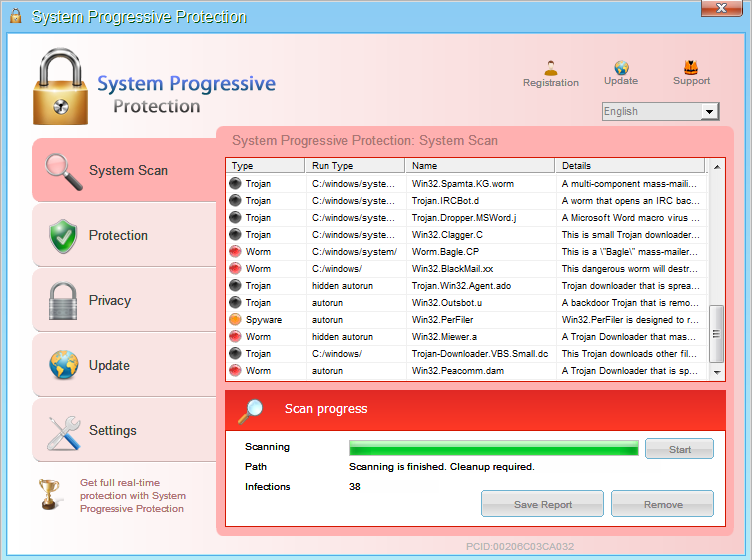
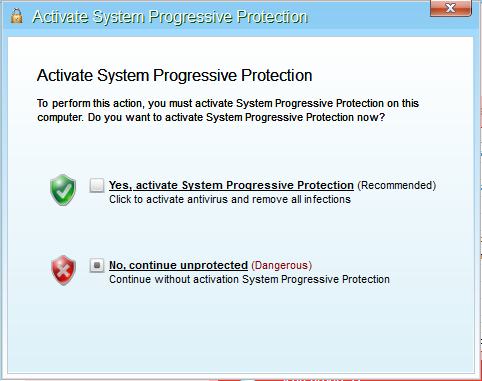
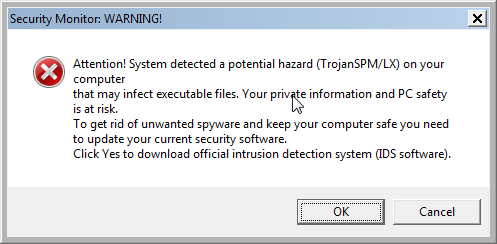
We strongly advise you to ignore any alerts that System Progressive Protection might generate and proceed with this removal guide as soon as possible.
Under no circumstance should you buy System Progressive Protection as this could lead to identity theft,and if you have, you should contact your credit card company and dispute the charge stating that the program is a scam and a computer virus.
Under no circumstance should you buy System Progressive Protection as this could lead to identity theft,and if you have, you should contact your credit card company and dispute the charge stating that the program is a scam and a computer virus.
Registration codes for System Progressive Protection
As an optional step,you can use the following license key to register System Progressive Protection and stop the fake alerts.
System Progressive Protection license key: AA39754E-715219CE
Please keep in mind that entering the above registration code will NOT remove System Progressive Protection from your computer , instead it will just stop the fake alerts so that you’ll be able to complete our removal guide more easily.
System Progressive Protection Removal Guide
STEP 1 : Start your computer in Safe Mode with Networking
- Remove all floppy disks, CDs, and DVDs from your computer, and then restart your computer.
- Press and hold the F8 key as your computer restarts.Please keep in mind that you need to press the F8 key before the Windows start-up logo appears.
Note: With some computers, if you press and hold a key as the computer is booting you will get a stuck key message. If this occurs, instead of pressing and holding the “F8 key”, tap the “F8 key” continuously until you get the Advanced Boot Options screen. - On the Advanced Boot Options screen, use the arrow keys to highlight Safe Mode with Networking , and then press ENTER.
![Safe Mode with Networking screen [Image: Safemode.jpg]](http://malwaretips.com/images/removalguide/safemode.jpg)
STEP 2: Repair your Windows Registry from System Progressive Protection malicious changes.
Smart Fortress 2012 has changed your Windows registry settings so that when you try to run a executable file (ending with .exe ) , it will instead launch the infection rather than the desired program.
- Download the registryfix.reg file to fix the malicious registry changes from System Progressive Protection.
REGISTRYFIX.REG DOWNLOAD LINK (This link will automatically download the registry fix called registryfix.reg) - Double-click on registryfix.reg file to run it. Click “Yes” for Registry Editor prompt window,then click OK.
![[Image: fix registry]](http://malwaretips.com/blogs/wp-content/uploads/2011/12/registry.png)
STEP 3: Run RKill to terminate known malware processes associated with System Progressive Protection.
RKill is a program that will attempt to terminate all malicious processes associated with System Progressive Protection,so that we will be able to perform the next step without being interrupted by this malicious software.
Because this utility will only stop System Progressive Protection running process, and does not delete any files, after running it you should not reboot your computer as any malware processes that are configured to start automatically will just be started again.
Because this utility will only stop System Progressive Protection running process, and does not delete any files, after running it you should not reboot your computer as any malware processes that are configured to start automatically will just be started again.
- While your computer is in Safe Mode with Networking ,please download the latest official version of RKill.Please note that we will use a renamed version of RKILL so that System Progressive Protection won’t block this utility from running.
RKILL DOWNLOAD LINK (This link will automatically download RKILL renamed as iExplore.exe) - Double-click on the iExplore.exe icon in order to automatically attempt to stop any processes associated with System Progressive Protection.
![RKILL ICON [Image: run-rkill-1.png]](http://malwaretips.com/images/removalguide/rkill1.png)
- RKill will now start working in the background, please be patient while the program looks for various malware programs and tries to terminate them.
![RKILL Command prompt [Image: run-rkill-2.png]](http://malwaretips.com/images/removalguide/rkill2.png)
IF you are having problems starting or running RKill, you can download any other renamed versions of RKill from here. - When Rkill has completed its task, it will generate a log. You can thenproceed with the rest of the guide.
![RKILL LOG [Image: System Progressive Protection rkill3.jpg]](http://malwaretips.com/images/removalguide/rkill3.png)
WARNING: Do not reboot your computer after running RKill as the malware process will start again , preventing you from properly performing the next step.
STEP 4: Remove System Progressive Protection malicious files with Malwarebytes Anti-Malware FREE
- Download the latest official version of Malwarebytes Anti-Malware FREE.
MALWAREBYTES ANTI-MALWARE DOWNLOAD LINK (This link will open a download page in a new window from where you can download Malwarebytes Anti-Malware Free) - Start the Malwarebytes’ Anti-Malware installation process by double clicking on mbam-setup file.
![Malwarebytes Anti-Malware Installer [Image: Malwarebytes Installer]](http://malwaretips.com/images/removalguide/malwarebytes-setup.png)
- When the installation begins, keep following the prompts in order to continue with the setup process. Do not make any changes to default settings and when the program has finished installing, make sure you leave both the Update Malwarebytes’ Anti-Malware and Launch Malwarebytes’ Anti-Malware checked. Then click on the Finish button. If Malwarebytes’ prompts you to reboot, please do not do so.
![Malwarebytes last setup screen [Image: Finishing Malwarebytes installation]](http://malwaretips.com/images/removalguide/update-malwarebytes.png)
- Malwarebytes Anti-Malware will now start and you’ll be prompted to start a trial period , please select ‘Decline‘ as we just want to use the on-demand scanner.
![Decline trial period in Malwarebytes Anti-Malware [Image: Decline Malwarebytes trial]](http://malwaretips.com/images/removalguide/malwarebytes-trial.png)
- On the Scanner tab,select Perform quick scan and then click on theScan button to start scanning your computer.
![Perform a Full System Scan with Malwarebytes Anti-Malware [Image: Starting a full system sca]](http://malwaretips.com/images/removalguide/start-scan-malwarebytes.png)
- Malwarebytes’ Anti-Malware will now start scanning your computer for System Progressive Protection malicious files as shown below.
![Malwarebytes Anti-Malware scanning for System Progressive Protection [Image: Malwarebytes scanning for malicious files]](http://malwaretips.com/images/removalguide/scan-malwarebytes.png)
- When the scan is finished a message box will appear, click OK to continue.
![Malwarebytes when the system scan has finished [Image: Malwarebytes scan results]](http://malwaretips.com/images/removalguide/results-malwarebytes.png)
- You will now be presented with a screen showing you the malware infections that Malwarebytes’ Anti-Malware has detected.Please note that the infections found may be different than what is shown in the image.Make sure that everything is Checked (ticked) and click on the Remove Selected button.
![Removing the infections found by Malwarebytes [Image: Infections found by Malwarebytes]](http://malwaretips.com/images/removalguide/detection-malwarebytes.png)
- Malwarebytes’ Anti-Malware will now start removing the malicious files.After completing this task it will display a message stating that it needs to reboot,please allow this request and then let your machine boot in Normal mode.
STEP 5: Remove System Progressive Protection rootkit with HitmanPro
- This step can be performed in Normal Mode ,so please download the latest official version of HitmanPro.
HITMANPRO DOWNLOAD LINK (This link will open a download page in a new window from where you can download HitmanPro) - Double click on the previously downloaded fileto start the HitmanPro installation.
![HitmanPro Installer [Image: HitmanPro Icon]](http://malwaretips.com/images/removalguide/hpro1.png)
IF you are experiencing problems while trying to start HitmanPro, you can use the Force Breach mode.To start HitmanPro in Force Breach mode, hold down the left CTRL-key when you start HitmanPro and all non-essential processes are terminated, including the malware process. (How to start HitmanPro in Force Breach mode – Video) - Click on Next to install HitmanPro on your system.
![HitmanPro installation process [Image: Starting HitmanPro]](http://malwaretips.com/images/removalguide/hitmanpro36-start.png)
- The setup screen is displayed, from which you can decide whether you wish to install HitmanPro on your machine or just perform a one-time scan, select a option then click on Next to start a system scan.
![HitmanPro setup options [Image: HitmanPro installation screen]](http://malwaretips.com/images/removalguide/hitmanpro36-installation.png)
- HitmanPro will start scanning your system for malicious files as seen in the image below.
![HitmanPro while scanning for System Progressive Protection virus [Image: HitmanPron scanning for System Progressive Protection]](http://malwaretips.com/images/removalguide/hitmanpro36-scan.png)
- Once the scan is complete,you’ll see a screen which will display all the malicious files that the program has found.Click on Next to remove this malicious files.
![HitmanPro displaying scan results [Image: HitmanPro scan results]](http://malwaretips.com/images/removalguide/hitmanpro36-results.png)
- Click Activate free license to start the free 30 days trial and remove the malicious files.
![Activate the HitmanPro free 30 days trial to remove any detected infections [Image: Activate HitmanPro license]](http://malwaretips.com/images/removalguide/hitmanpro36-activation.png)
- HitmanPro will now start removing the infected objects.If this program will ask you to restart your computer,please allow this request.
STEP 6: Double check for any left over infections with Emsisoft Emergency Kit
- You can download the latest official version of Emsisoft Emergency Kit from the below link.
EMSISOFT EMERGENCY KIT DOWNLOAD LINK (This link will open a download page in a new window from where you can download Emsisoft Emergency Kit) - After the download process will finish , you’ll need to unpack EmsisoftEmergencyKit.zip
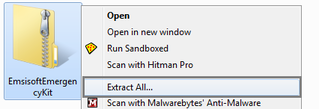
- Open the Emsisoft Emergency Kit folder and double clickEmergencyKitScanner.bat.
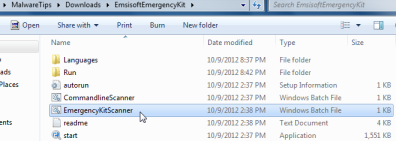
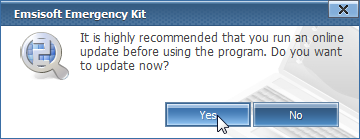
- A pop-up will prompt you to update Emsisoft Emergency Kit,and you’ll need to click the Yes button to allow this request.
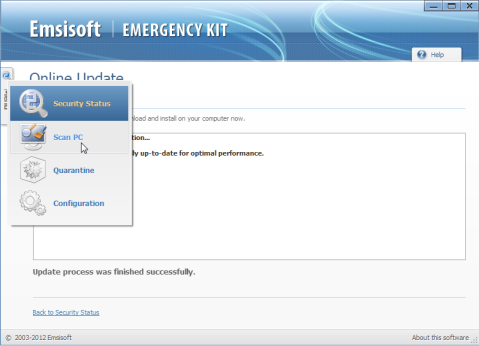
- After the Update process has completed,click on the Menu tab and then selectScan PC.
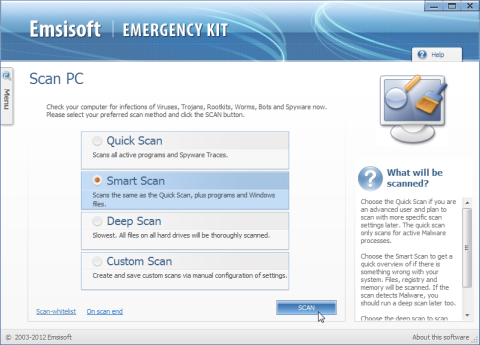
- Select Smart scan and click on the SCAN button to search for System Progressive Protection malicious files.
- Emsisoft will now start scanning your computer for malicious files.When the scan will be completed,you will be presented with a screen showing you the infections that Emsisoft has detected.
Make sure that everything is Checked (ticked) and then click on Quarantine selected objects.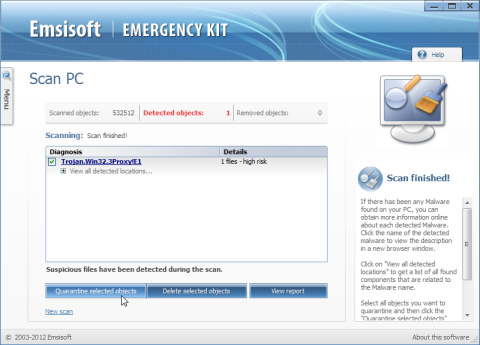
- Emsisoft Emergency Kit will now start removing the malicious files.If during the removal process Emsisoft will display a message stating that it needs to reboot, please allow this request.


0 komentar:
Posting Komentar